

How To Repair Water Leak In Ceiling

Regardless of the water'due south source, h2o damage cases are considered emergencies that require prompt action. The excess h2o will become absorbed by whatsoever porous building materials in your property, including drywall and furniture. This absorption then makes it piece of cake for the water to spread to new areas of your property, thus worsening the damage.
Furthermore, the more h2o that materials absorb, the less stable they will be. For example, a water-damaged wall that continues to take in more water will eventually deteriorate and suffer structural damage. The presence of excess water can also pb to mold growth.
Repairing a H2o-Damaged Ceiling
If a ceiling in your belongings has sustained water damage, it is of import to repair it right away. Failing to practice and then will threaten the structure'southward integrity and people's safety. Knowing this, y'all need to act immediately to foreclose further impairment.
Use the post-obit information to help make repairs to a water-damaged ceiling.
1. Stop the Water Source
In whatsoever water damage situation, the beginning thing yous need to practise before you can brand repairs is to accost the water source. This is important to prevent any further water damage. If you exercise not stop the water source beforehand, and so it will proceed to impairment the ceiling. Any repairs yous make will then become useless.
To locate the source, you might demand to remove the damaged drywall. Since water can spread, the source may be far from the damaged ceiling area. So once y'all find it, make whatsoever repairs or replacements needed to stop the water.
2. Dry the Afflicted Areas
Once the water source has been addressed, the water-damaged ceiling can and then be dried.
First, place downwards a tarp to protect the floor and any furniture in the room from h2o and droppings. Then, get together materials y'all can use to dry the ceiling, including fans and towels. Have fourth dimension to dry the areas above and below the ceiling to ensure you thoroughly accost the moisture.
If h2o is still dripping afterwards you've dried the ceiling, you lot can be sure it is still too saturated and requires further drying. You might need to cut out the sections that are withal moisture so you tin dry it.
If the ceiling's drywall is bulging, puncture it to release the water. But starting time place a saucepan beneath the swollen area to grab any water.
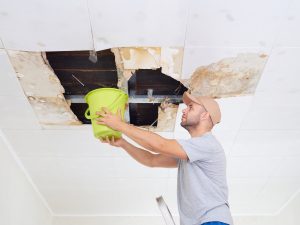
3. Remove the Damaged Sections
 Before you practice any more piece of work, make sure to vesture protective gear, including safety goggles and a face mask.
If the water-damaged ceiling is peeling or bulging, if you haven't done so already, scrape those parts off. Other damaged sections, such as those with h2o stains, should be removed likewise.
If the drywall has stains but has not sustained structural damage, you tin can salvage it by cutting out but the affected areas. Utilise a keyhole saw to cut out the damaged department into the shape of a rectangle or foursquare. Then you can easily replace the role with a drywall patch later.
4. Repair the Ceiling
Using sandpaper, smooth downwards whatever ridges, bumps, and rough areas. Fill modest holes with joint compound, let it dry out, and then use more sandpaper to smooth information technology out.
For sections where yous cut out the drywall, measure the hole. Then cut a new piece of drywall out to fill up the hole, but make sure it is two inches wider and longer than the hole. You want to start with a slice that is bigger than necessary and size it down using a utility pocketknife. Once the agglutinative has stale, add a layer of joint compound, and smooth it downward with sandpaper.
v. Prime number and Paint the Ceiling
When you are done with repairs, open windows to provide proper ventilation for the priming and painting process. Apply primer to the ceiling and allow it to dry out. Once dry out, you may repaint the ceiling.
Although the entire ceiling may not have been harmed, it is best to prime and repaint the whole ceiling to ensure even coverage.
Phone call for H2o Damage Restoration
Because water impairment is considered an emergency, immediate action is important. Sometimes, these situations crave more than do-it-yourself repairs. Whether the job is too much for you, or you are unequipped to take intendance of a water-damaged ceiling yourself, you can hire professional aid for water damage repairs and restoration services.
Professional water damage restoration companies are available to aid restore homes and businesses that have sustained water impairment, including water-damaged ceilings. No thing what caused the impairment, professional technicians volition fix the h2o source, remove backlog water and wet, dry out affected areas, and make the necessary repairs. If the water has led to mold growth, professionals will handle its removal, too.
With help from a professional h2o damage restoration service, your water-damaged property volition be repaired and prophylactic to return to.
![]()
About Luke Armstrong
Expert in emergency fire and water restoration services, fire cleanup and water damage cleanup, mold removal, likewise equally rug and upholstery cleaning services. Contributor to several restoration and cleaning blogs.
Source: https://restorationmasterfinder.com/restoration/how-to-repair-a-water-damaged-ceiling/
0 Response to "How To Repair Water Leak In Ceiling"
Post a Comment